
The fast-paced world of online photo sharing and the conveniences of digital development have combined to encourage increasingly rapid and frequent production of photographs, an approach that is very likely to favor quantity over quality. Indeed, most social media platforms give photographs a shelf life of about 24 hours before algorithms bury them in the obscurity of yesterday. This dizzying cycle can create a sense of urgency for photographers, increasing the temptation to fill the void left by each ‘expired’ photograph as quickly as possible.
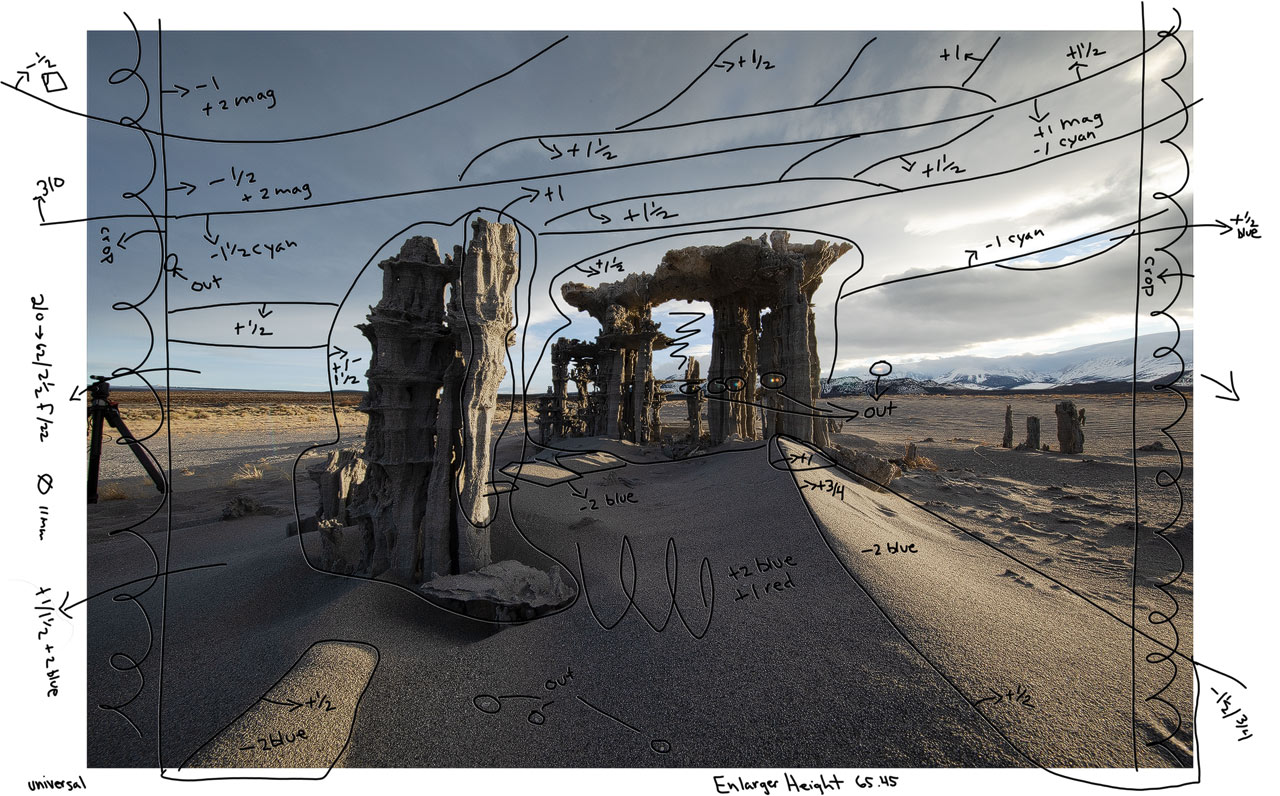
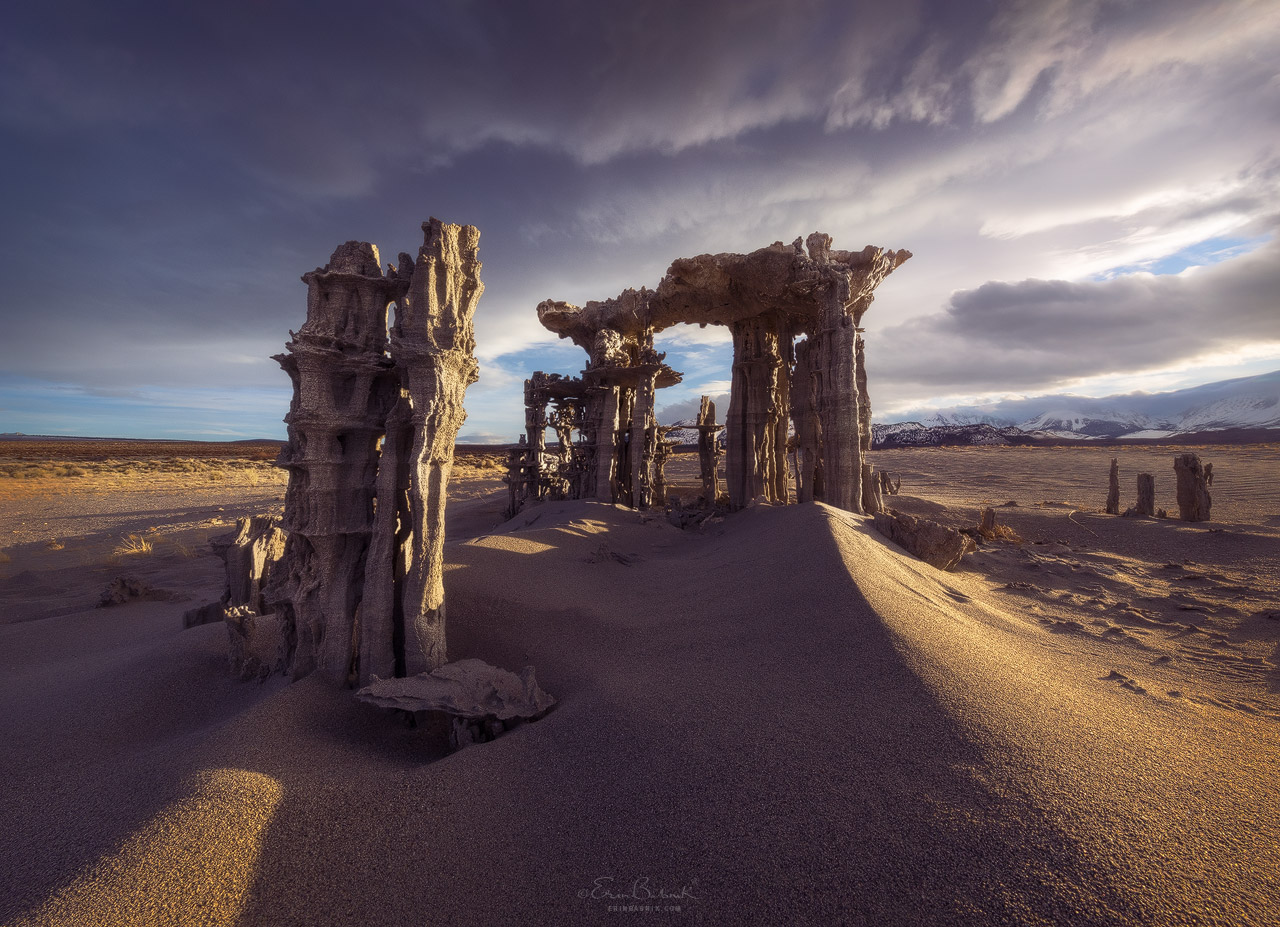
“The Lost Ark” derived from only a single exposure, but a great deal of time went into completing the many tonal and color adjustments necessary to achieve the final look. Before I even sat down to edit the photo, I set it aside for a couple of months to let my mind gain some ‘distance’ from my experience in the field. After editing the image, I waited another several weeks before deciding to release it. Altogether, about three months elapsed between the time that I pressed the shutter button and the time that I released the photograph, which is about as fast as I ever turn out a new addition to my portfolio. The above spoof on historical darkroom notations is hardly an actual processing plan, but it gives a nod toward the habits of craftsmanship from previous eras that still have much value today.
Although we often hear the age-old advice that it is good for photographers to “slow down” in the field in order to ensure that we are making the best photo that we can, the same concept does not always carry through to the processes of self-curation and image development. In today’s era of breakneck ‘content creation’, even the most ambitious photographers can throw patience out the window after getting home with a batch of new photos in the bag. There is much to be gained by being a productive artist, but it is just as beneficial to be a critical one, releasing new photographs only when you have given them the full benefit of your scrutiny and artistry. Going through the following steps with each new photo can help you to nurture your own creative development and to put your best foot forward with each addition to your portfolio.

Look at it with Fresh Eyes
The impressions of an experience in the field can distort the way that we see a new photograph, sometimes causing us to overlook aesthetic issues that might be bothersome once the memories begin to wear off. Likewise, a round of post-processing may also create some excitement that can cloud judgement—sometimes the added effort in development makes a photo start to sing, but it may take some time to realize that it’s singing too loudly or somewhat off-key. Therefore, my own preference is to put a new photograph through two ‘incubation’ stages, one after I first upload it to a computer and then again after developing it. As I described in a recent podcast interview, these two stages can be quite lengthy for me, sometimes lasting for months or even years. Even a short break of a day or two can be extremely helpful, allowing the mind to gain enough distance from the in-field experience or the development process to exercise good judgement.

Compare it to Other Photographs
It can be both revealing and helpful to view a new photo within the context of your own portfolio. How does it sit alongside your other finished photographs? If it is a departure from your own norms, are the differences intentional? You might also compare your final image to photos by other photographers who were sources of inspiration to you, although be careful not to push such comparisons too hard—it’s more rewarding to feel as though you are in dialogue with other photographers rather than feeling as though you’re merely echoing them. Alas, not every photograph that you produce will make a good contribution to your portfolio, even if it is a visually compelling image that involved a lot of effort in the field and in the digital darkroom. Sometimes a photo that is likely to bring in some ‘points’ on social media will do you a disservice in the long run by being too similar to other photos in your portfolio or to photos in the portfolios of other photographers. Alternatively, a photo simply may not be cohesive with a body of work that you are developing. Being selective about what you choose to reveal to the world can help you to get a better sense for what you value in your own photography, and careful self-curation can go a long way towards growing an audience that recognizes ‘you’ in your photographs.

Give it the Flip Test
A good method for forcing yourself to see a photo differently is to flip it upside down. The “Flip Test” can abstract the content of a photo enough for your eyes to see it as a combination of forms, tones, and colors rather than as a representation of a place and your experience within it. Flipping a photo left-to-right can also be helpful in highlighting flaws that the mind’s eye was filtering out, although it may reverse the ‘flow’ of a composition, possibly causing the lines of an image to run against the direction that you intend it to ‘read’. Therefore, a left-to-right flip is better for judging issues such as balance, hierarchy, tonality, and color harmony more so than the eye’s path through a composition.

View it as a Thumbnail
There are a variety of circumstances that can cause us to be too ‘close’ to an image to see it well, including the use of a large monitor or doing a lot of editing while zoomed in to a high level of magnification. Seeing a photo at a large size or while zoomed in can cause us to lose sight of its grand forms, those features of a composition that give it a strong sense of structure, balance, or rhythm. Not all compelling photos will read clearly as a thumbnail, but most do, so it can be very helpful to see how well a photo retains its visual interest when reduced to a small size. Zooming out until the photo is only a few inches wide can help to emphasize whatever features are most dominant, those that give the photo its structure. More often than not, a photo that completely loses its impact at a small size is one that would benefit from some editing to aid or to emphasize the composition.

Check the Final Histogram
Most photographers learn early on about the value of checking histogram levels in the field, but it is also important to check the final histogram after post-processing. Not all final photographs need to have a full spread of tones from dark to light, nor do they all need to have a symmetrical distribution with a nicely centered hump over the mid-tones. Landscape photographs tend to end up with a histogram showing a hump left of center (that is, a darker image) or else high key, with few darker tones at all. Nonetheless, it is important to check the final histogram to see if you really have the right spread for the look that you are trying to achieve. You may discover that your image is slightly too flat or that a color channel is unexpectedly clipped at either end of it the range. A final check of the histogram can help you to eke out that extra bit of refinement that makes a photograph more impactful.

Run a Temporary Auto Levels Adjustment
It is very easy for our eyes to adjust to a color cast and thereby cease to notice it. Although some color casts may be intentional and compelling, others are simply byproducts of a camera’s sensor or of post-processing treatments. Running an auto levels adjustment on a final image can force out any color cast, allowing you to see how a more neutral rendition would affect the photo. It will also force the tones into a full spread across the histogram. This little test can be very revealing, even if the auto adjustment takes the corrections too far. If there is an unintentional color cast, then you’ll be able to spot it and deal with it accordingly.

Run it Through Adobe Color CC
Color adds a layer of complexity to a photograph that can have a dramatic effect on everything from a photo’s composition to the mood that it imparts. In my previous article for the Photo Cascadia blog, I explained how to use Adobe Color CC to get an automated visualization of a photo’s color palette and how to use that information to achieve creative goals. Running a final version of a photograph through this online application can help you to spot anomalous colors or unharmonious palettes that might detract from the strengths of a photograph.

Compare it to Previous Versions
As I edit a photo, I like to save out a web-sized preview of it each time that I make any substantial edits to colors or tones. I save all of these drafts and then compare them side-by-side with my final image. Sometimes I discover that I took a wrong turn along the way and should have stayed with an earlier rendition, or alternatively, I realize that I’m headed in a good direction and that taking it a bit further along those lines would be even better for my purposes.

Seek Out Critique
If you want to know whether or not your new photo is great, just ask your mother. On the other hand, if you want to get an idea of how someone with refined sensibilities might see the photo, then seek out critique from a photographer whose work you admire (and consider yourself very fortunate if your mother falls into this latter category!). Getting honest feedback from such people is pure gold, but it can be difficult to find anyone of the right caliber who has the time and inclination to comment thoughtfully. There are numerous online forums and social media groups where critique is encouraged, and many of them have members who are accomplished photographers with a penchant for helping others. Helpful criticism includes comments about aesthetics as well as about content and portfolio development. Be sure to take it all onboard with an open mind, and accept that points of disagreement can be very valuable in helping you to affirm creative decisions for yourself—if you are receptive to some points of criticism and not to others, then you’ll know which qualities of your photograph or your portfolio you value the most. The more personal that your photography becomes, the less that you may gain from critique, but even seeking quality feedback on a very infrequent basis can be beneficial in helping you to see threads of development or moments of creative drift.

March to Your Own Beat
Once you have decided that a photograph belongs in your portfolio, it may still be a good idea to keep it under wraps for a while. If a photo suggests a new direction for you, perhaps you will want to unveil it along with subsequent work that will help to flesh out your progression. Alternatively, you may decide that the photograph will draw too much attention to a location that is experiencing rare conditions, in which case, perhaps it would better to wait until revealing the image will cause less disruption to that area. There are many reasons why it might make sense to bide your time with a new photo release, ultimately allowing the development of your portfolio to unfold according to your own instincts and on your own schedule.
Do you ever feel pressure to release new photographs quickly or frequently? Which of these checks on the process do you find most helpful? Are there any others that you like to employ? Please feel free to share your thoughts and questions in the comments below!
Erin Babnik is known internationally as a leading photographic artist, educator, and speaker, and she is honored to be a Canon Explorer of Light. Immersion in the visual arts has been the one constant in Erin’s life, including an extensive background in various visual media and a doctoral education in the History of Art. She is based out of offices in Europe and California and travels widely for workshops and speaking engagements. She is also known for her love affair with all things purple. | Erin’s Website: www.erinbabnik.com
Recent Comments