
A little while back I posted the video below on my YouTube channel showing how you can use Lightroom CC (which you get as part of your Adobe Creative Cloud photography subscription) to sync images over from Lightroom Classic so you will then be able to access them on your phone, iPad or laptop anywhere in the world.
Watching the video is the best way to see how to do it, but here are the written steps:
- Go to your Adobe Creative Cloud desktop app and install Lightroom CC on your main computer (the one you have your Lightroom Classic catalog on).
- Use the Adobe CC app to also install Lightroom CC on any other computers or laptops you want to access your images from.
- Go to the App Store from your phone, iPad or any other device you want to access your images from and install the Lightroom CC app.
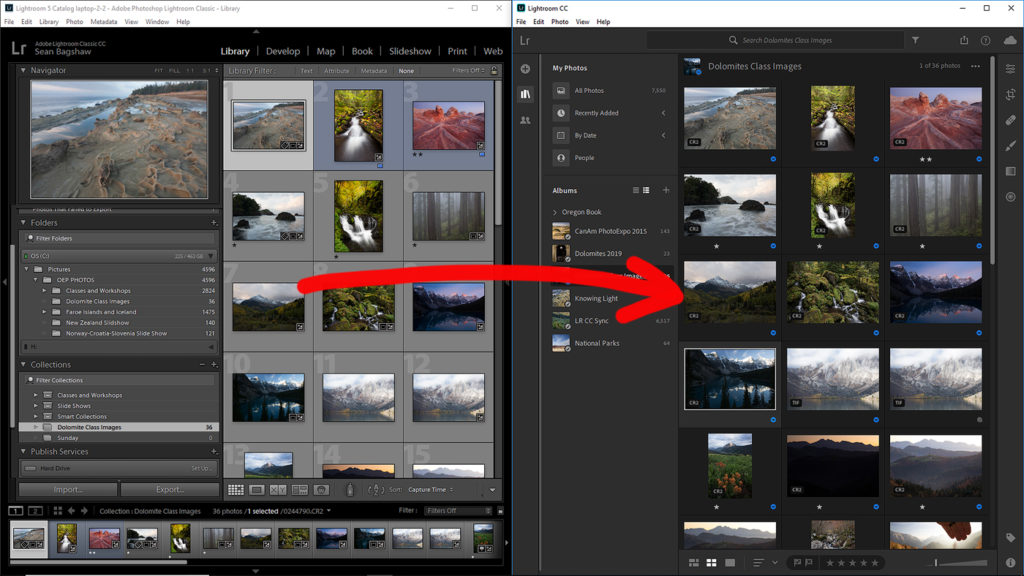
- In Lightroom Classic on your main computer, click on the Lightroom badge in the upper left corner the screen and then click start where it says “Sync with Lightroom CC”.
- Go to your Lightroom Classic collections and click the small Sync icon to the left of any collection you want to have access to in Lightroom CC. The images in those collections will begin syncing to the cloud.
- Open Lightroom CC and verify that the collections you selected to sync are showing up in Albums.
That’s all there is to it. Any collection you click the sync icon for will sync to the cloud and you will be able to access those photos in Lightroom CC from any computer, phone or tablet. If you want to remove a collection of images from
As I show in the above video, DNG smart previews of your images are uploaded to the cloud when you sync this way. Smart previews are downsized images that don’t take up much space. You have full raw file editing capabilities over these smart previews in Lightroom CC and any edits you make will be synced to the cloud and back to your Lightroom Classic catalog. Smart previews are 2560 pixels on the long side, which is big enough for any web usage and even good enough for prints up to 10 or 15 inches.
Putting It Into Practice On A Trip
As I write this I’m traveling in Europe to lead a photography workshop in the Dolomites with fellow Photo Cascadian, Erin Babnik. I’m using the Lightroom CC syncing capability to do a few different tasks while traveling that would have previously been much more complicated. At the bottom, there is a second video in which I explain what I did.
Use #1
First, I already have 6500 of my best images synced as smart previews to Lightroom CC, which I show in the video above. During the trip, I will be able to access these images on my phone. Having them on my phone is great for sharing with people I meet and for teaching purposes on location. I can also access them on my laptop if I need to submit any to a client, insert in a blog or place on my website. In fact, I did get a request for an image submission from a calendar company. I was able to do a keyword search in Lightroom CC for National Park images, put together a submission, create a web album page of the images and send the link to the publisher.
Use #2
Second, on my laptop, I need to have original raw files of the images I will use during the classroom portion of the workshop. If I just used smart previews for the class it would be a simple matter of making a collection of the images in Lightroom Classic and then syncing it to Lightroom CC as I show in the video and
- I started by making a collection of my class images in Lightroom Classic and then clicking the sync icon. This syncs the smart previews as before.
- Then I exported the original files of all the images in that collection into a folder on the desktop of my main computer using the Export function in Lightroom Classic.
Next I opened Lightroom CC on my main computer and used the + button to add all those original raw files to Lightroom CC.- Because the smart previews of those raw files were already synced to Lightroom CC, it simply replaces the smart previews with the originals in Lightroom CC AND it then syncs the ORIGINAL FILES to the cloud (yes…only smart previews sync to the cloud from Classic but full resolution files will sync to the cloud from CC).
- When the originals completed uploading to the cloud I opened Lightroom CC on my Laptop, right clicked on the synced album and selected “Store Album Locally” to download the original files to my Laptop.
With all the originals downloaded to my laptop, I will be able to edit them in Lightroom CC and open them in Photoshop for the class.
Use #3
The third way I will use Lightroom CC syncing will be to transfer raw files taken during the trip onto my laptop and import them into Lightroom CC for review, deleting and perhaps some initial Lightroom adjustments. I can also open raw files into Photshop on my laptop to edit there. When I save the layered tiff files from Photoshop they will also be saved in the Lightroom CC.
All of these original raw files and layered tiff files with their adjustments will be synced to the cloud (assuming I have good enough wifi access) and waiting for me in the Lightroom Mobile collection in Lightroom Classic on my office computer when I get home from the trip. This saves me time transferring these originals from my laptop to my main computer when I get home and it backs up those images in the cloud while I’m traveling. Even if something happens to my flashcards or laptop during the trip, I will still have those images when I get home.

Sean is an outdoor photographer, digital image developing enthusiast and photography educator based in Ashland, Oregon, where he resides with his wife and two sons. His previous career as a science teacher makes photography education a good fit. Sean teams up with fellow Photo Cascadia members leading workshops. He also teaches digital image developing classes, lectures and offers a series of Photoshop video tutorials.
More posts by Sean Visit Sean’s Image Gallery Visit Sean’s Website
Recent Comments