
To commemorate ten years working together as the Photo Cascadia team as well as publishing our blog, we have been periodically sharing articles from our sizable archives. A focus of my career in photography has been photography education, particularly instruction in image developing using Photoshop. Reflecting that focus, much of what I have published on the Photo Cascadia blog over the years has been instructional articles and video tutorials with ideas for post processing.
So, I thought it might be fun and useful to revisit some of my articles from the past in which I share image developing tips and techniques.
I’ll start with something simple but critical…dust spot removal. Of all the advantages offered by digital cameras, sensors that attract dust isn’t one of them. Some dust spots are large and obvious, but small faint spots which are easy to miss at the beginning of your workflow can become painfully obvious as image contrast is increased or if the image is printed large. In this article from 2010 I share a simple method I use in Photoshop to help find and remove even the most hard to see dust spots. Updates I would now add to this article include that Lightroom has a very helpful feature for finding hidden dust spots and Tony Kuyper has also added a dust removal action to the TK Panel which performs a more advanced version of my simple technique.
In 2011 I published this article on the finer points of sizing images in Photoshop, including a discussion of why, despite popular belief, the pixel per inch (PPI) setting is irrelevant to image size or quality when viewing on a monitor.
I revisited the topic again in 2019, this time in video format.
Adding or enhancing soft, glowing light in landscape photos has become a common tool of landscape photographers. There are many methods of doing so. In this 2013 article and video, I shared a couple of techniques that I had been working on and using at the time.
This tutorial on working with tonal balance using a luminosity mask technique called “masking the mask” seems to have been particularly instructional and useful. The technique is still as relevant now as it was in 2015 when the article was published.
Dodging and burning using 50% gray layers in Photoshop was something I learned in the early 2000s as I was trying to get better at non-destructive image editing. In 2015 Photoshop master, Mac Holbert, showed me the advantages of using transparent layers for dodging and burning instead of gray layers. I paid that knowledge forward in this tutorial and Tony Kuyper subsequently added transparent layer dodge and burn to the TK Panel.
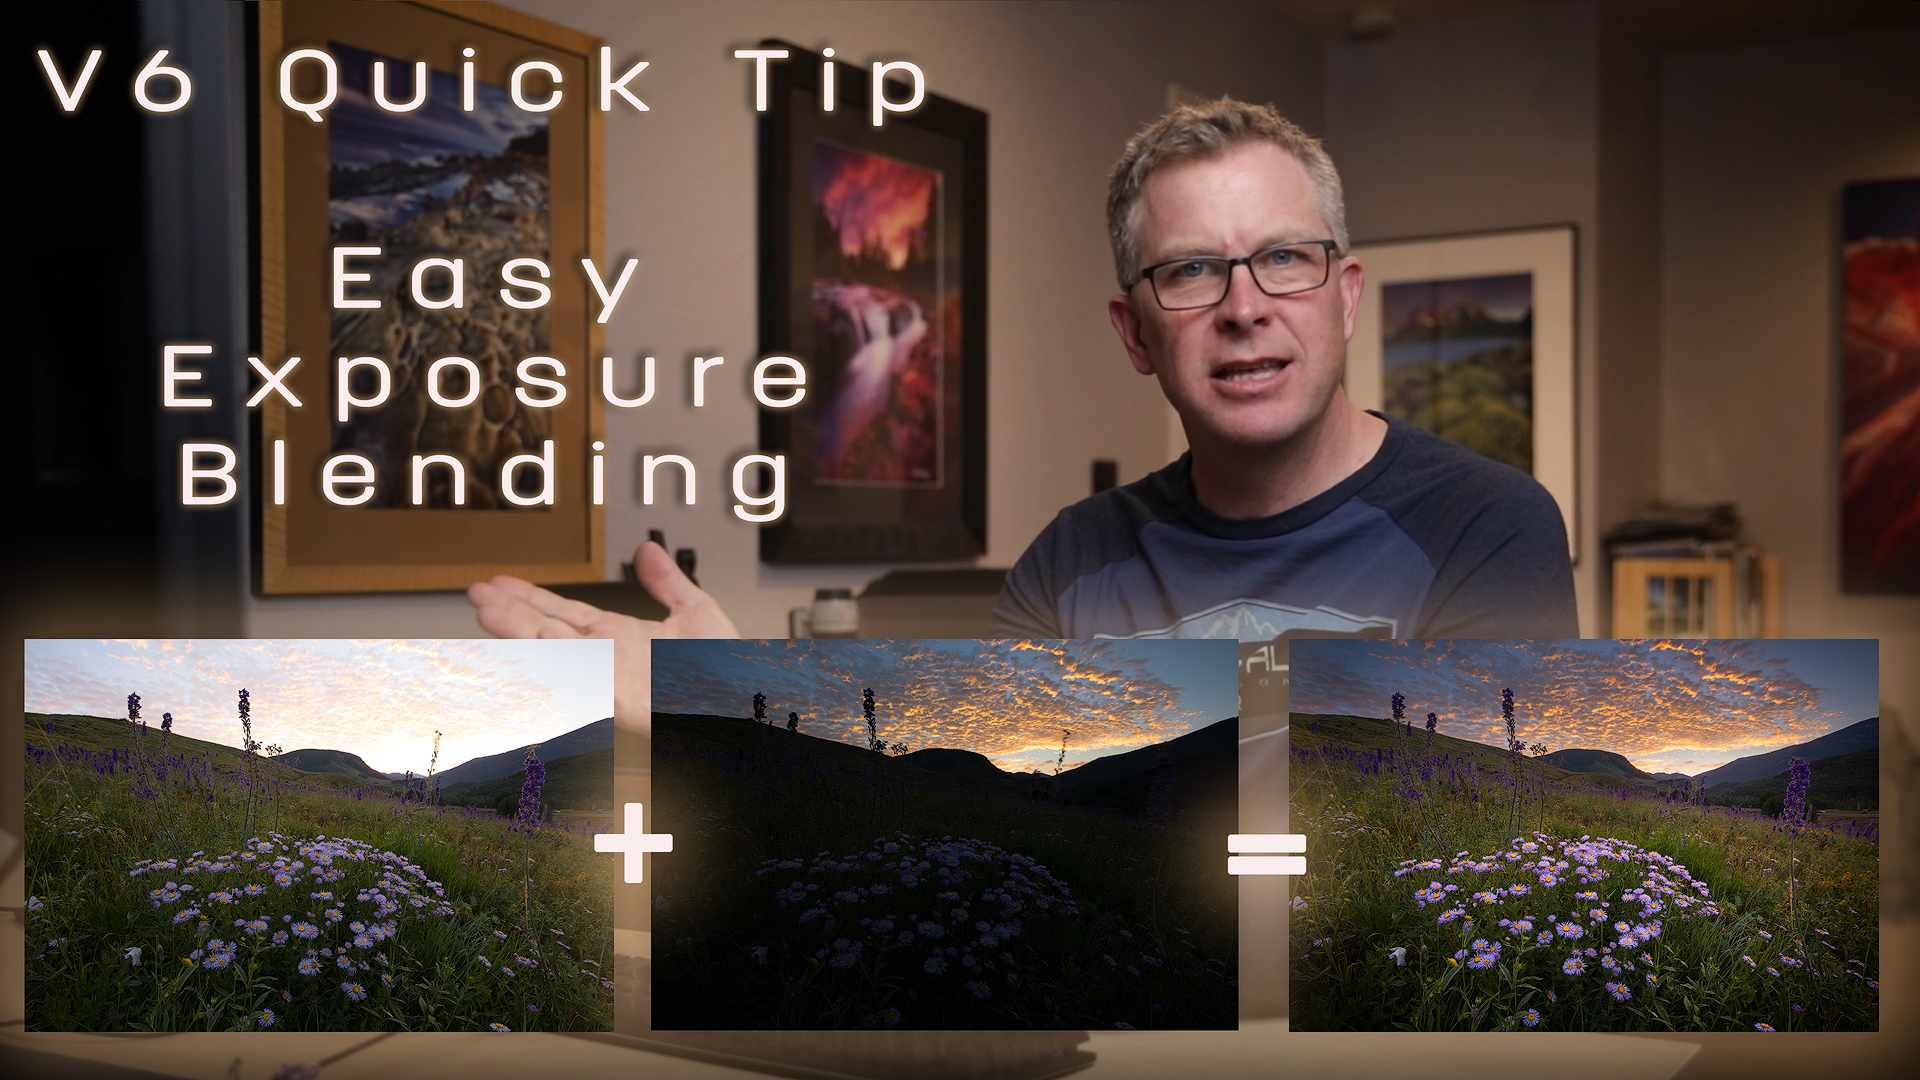
I’ll end this trip down amnesia lane with a tutorial I published in 2018 showing a method for fast exposure blending that also looks natural and is easy to accomplish. This is the technique I use almost exclusively now.
If you are a newer reader of the Photo Cascadia blog then I hope that these past articles are a helpful discovery. If you have been a long-time reader then I hope this look back has been a valuable refresher.
This is only a small sample of the educational article I have published over the last decade. In the future I’ll share some others, but you are always welcome to explore our past blogs on your own. You never know what you might dig up! As always, if you have questions or comments you can write them in the comments section of this or any article and I will be glad to reply.
Sean is an outdoor photographer, digital image developing enthusiast and photography educator based in Ashland, Oregon, where he resides with his wife and two sons. His previous career as a science teacher makes photography education a good fit. Sean teams up with fellow Photo Cascadia members leading workshops. He also teaches digital image developing classes, lectures and offers a series of Photoshop video tutorials.
More posts by Sean Visit Sean’s Image Gallery Visit Sean’s Website
Recent Comments